


Night Vision Full Color Infrared Scope
The advanced Night Vision Full Color Infrared Scope produced by Shenzhen Optical Microsemiconductor Technology Co, Ltd., a cutting-edge product in digital optics, is now available, offering a whole new experience that exceeds all expectations.
Send Inquiry
Product Description
This Shenzhen Optical Microsemiconductor Technology Co, Ltd.,’s Night Vision Full Color Infrared Scope provides 1080P high-definition resolution night vision mode, high-definition resolution and fast and accurate optical technology, quickly observe images on the high-definition screen, Sony sensor and single-core A9 processor allow you to Simultaneously record video and sync phone preview.
Do you want to experience long-lasting battery life? This machine has a built-in lithium battery with a long battery life of 12 hours.
A new upgrade experience with one-key reset function.
In addition, you can also experience a series of other functions from this machine.
Do you want to experience long-lasting battery life? This machine has a built-in lithium battery with a long battery life of 12 hours.
A new upgrade experience with one-key reset function.
In addition, you can also experience a series of other functions from this machine.
Specification parameters
| Function | Parameter Description | Function | Parameter Description |
| Objective lens diameter | 50mm | app | ios&Android |
| digital zoom | 8 times | WiFi | have |
| sensor | SONY | play back | Support local playback video |
| Exit pupil distance | 50mm | picture in picture | yes |
| Field of view | 6.5° | electronic compass | yes |
| IR Infrared | 940nm | 3D gyroscope | yes |
| screen resolution | 1024*768 | microphone | yes |
| Battery working time (full charge) | 12H | One key to zero | yes |
| focus cross pattern | 5 colors + 8 patterns | fast charge | Support PD fast charging |
| Video resolution | 1080P @60/30fps 720P@90/60/30fps | Reset button | reset restart |
| image | 1920*1080 | waterproof level | IP68 |
| full color night vision | yes | size | 79X350mm |
| Recoil Activation Video | yes | weight | 960g |
Equipment preparation
unbox
1. Open the packing box and take out the main device.
2. Make sure you have the following contents in the box: body, rubber eye mask, bracket x3, infrared flashlight, dust-free cloth, storage bag, charging cable.
3. Check whether the optical surface, body, lens, operation buttons, etc. of the equipment are damaged.
4. Make sure all optical surfaces are clean and ready for use.
Charge
The instrument is equipped with a USB interface and a data cable, which can be connected to the charger with the data cable. It takes a long time to charge with a low-current charger. It only takes 3.5 hours to charge the scope with a 9V/2A USB charger.
1. A 2A USB charger is recommended.
2. The battery is fully charged and can run for 12 hours.
power button
1. Short press to power on
2. Press and hold for three seconds to shut down
3. In the power-on state, short press to switch between color and black and white modes
Record key (REC)
Preview interface Short press to record and press again to pause
WIFI key
1. Press and hold the WIFI button for 3 seconds to open the WIFI interface. If the link is successful, it will automatically return to the preview interface
2. Long press the wifi button again to turn off the wifi function, and the wifi icon on the interface disappears.
Notice:
After opening WIFI in the menu and opening the shortcut key, if the APP is not connected.
Open the WIFI icon (displayed in white) in the upper right corner of the machine, if it is connected to the APP.
WIFI icon turns blue
Using the buttons and scroll wheel
Two ways to use the buttons
1. Rotation button: up and down rotation function, the machine browses the menu up and down in the menu mode
2. Long press the keyboard: long press the key to enter the menu interface, short press the menu selection confirmation key

Micro SD and Type-c interface
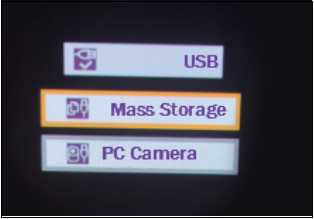
1. Connect the USB port of the machine to the data cable. The other end is connected to the computer (the dedicated player needs to be turned on on the computer). When the machine is turned on, the prompt on the right will appear on the screen.
2. Select the Mass Storage machine to enter the USB mode; you can view and play the files in the TF card in the machine on the computer.
3. Select the PC Camera mode, and a dedicated player needs to be opened on the computer. The machine is equivalent to the camera of the computer. Synchronously view the medium screen of the machine on the computer.
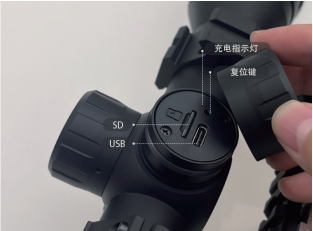
The device is equipped with a microSD card and a Type-c interface. You can swing open the cover on the right side of the device to remove it.
As shown on the right.
Notice:
1. The memory card cannot be installed backwards, forcibly inserting it will damage the instrument and the memory card
2. Format the memory card before inserting it
3. The power must be turned off before inserting the memory card
4. The charging indicator light flashes to indicate that charging is in progress, and the indicator light is always on to indicate that it is fully charged
2. Select the Mass Storage machine to enter the USB mode; you can view and play the files in the TF card in the machine on the computer.
3. Select the PC Camera mode, and a dedicated player needs to be opened on the computer. The machine is equivalent to the camera of the computer. Synchronously view the medium screen of the machine on the computer.
The device is equipped with a microSD card and a Type-c interface. You can swing open the cover on the right side of the device to remove it.
As shown on the right.
Notice:
1. The memory card cannot be installed backwards, forcibly inserting it will damage the instrument and the memory card
2. Format the memory card before inserting it
3. The power must be turned off before inserting the memory card
4. The charging indicator light flashes to indicate that charging is in progress, and the indicator light is always on to indicate that it is fully charged
Focal Length:
Preview interface Short press to record and press again to pause


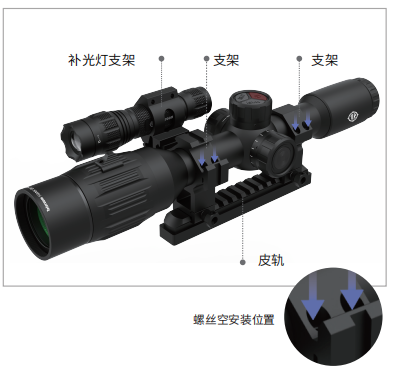
Install:
The package contains 2 leather rail brackets and 1 flashlight type bracket, which can be installed according to the way of installing ordinary sights.
Description of infrared fill light:
Notice:
Do not point the device at your eyes before installation. Infrared light will cause damage to your eyes. Do not point the device at your eyes. The company has informed that the company will not be responsible for any injury caused by improper operation.
Do not point the device at your eyes before installation. Infrared light will cause damage to your eyes. Do not point the device at your eyes. The company has informed that the company will not be responsible for any injury caused by improper operation.

IR940nm infrared lamp
One 18650 battery
The light spot of the head rotating light will be concentrated, and the irradiation distance will be longer
Tail power switch: After turning on the infrared light, touch the switch button, and the infrared light can switch gears: high, medium and low.
Switch gears according to actual needs.
1. When tightening/loosening the tail cap, please hold the battery and the flashlight tube.
2. Install the battery on the body, pay attention to the positive and negative polarity of the battery.
3. Install the tail cap back on the valve body.

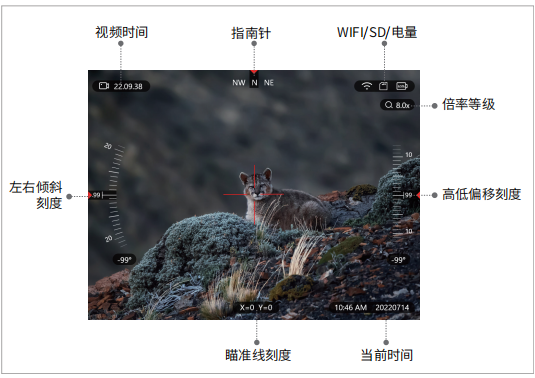
The first screen that appears after turning on the instrument is the main screen, which consists of scales, status bar icons and different information widgets.
Scale:
According to the electronic compass data, the yaw angle displayed on the compass scale
According to the data measured by the three-dimensional gyroscope, the tilt scale shows the tilt degree of left and right and front and rear.
Status Bar
Battery battery - display power
Micro SD Card SD card-displays whether the memory card is installed
WiFi - only displayed when the function is active
Displays the current status of the instrument system. Some icons can be hidden automatically.
For details, see: "Display Settings" --- "Screen Widget Display" for operation
Menu interface:
In the preview interface, press and hold the menu confirmation button for 3 seconds, and the machine enters the main menu interface (as shown in the figure below); the up and down rotary switches can select related menu functions. Press the confirm key to enter the next menu.
set up
This menu can set the following parameters
·language
·Date/Time
·G-Sensor
·Gyroscope calibration
·Compass correction
·Automatic shut-down
·Unit setting
·format
·reset
This menu can set the following parameters
·language
·Date/Time
·G-Sensor
·Gyroscope calibration
·Compass correction
·Automatic shut-down
·Unit setting
·format
·reset
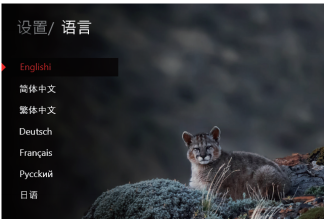
1. Language
Multiple languages are optional, see picture for details
2. Date/Time

3. G-Sensor sensitivity

4. Gyroscope Calibration
Enter the setting menu, click Gyroscope Calibration, click Confirm and operate according to the interface prompts, and place the machine horizontally.
Note: When calibrating the instrument, the compass will work better if the instrument is kept parallel to the ground.
5. Compass Calibration
Enter the setting menu, click Compass Calibration, click Confirm and operate according to the interface prompts, as shown in the figure.
6. Automatic shutdown

7. Distance unit setting

8. Formatting

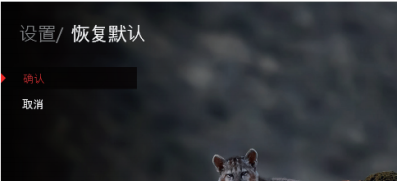
9. Restore default
picture in picture
After selecting this function (or entering it with a shortcut key), press the REC key to return to the preview interface. reticle
The target object in the center will be enlarged and displayed at the top of the screen. Objects will be clearer.
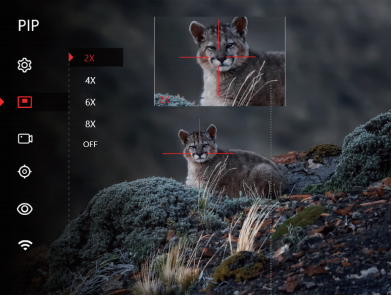
.Picture-in-picture window
.Window magnification can be changed freely
.Shortcut key: short press the wifi key to start picture-in-picture
.Window magnification can be changed freely
.Shortcut key: short press the wifi key to start picture-in-picture
Video function
1. Resolution setting
Press the menu confirmation button to enter the next menu, the optional video resolution is:
1920*1080P-60fps
1920*1080P-30fps
1280*720P-90fps
1280*720P-60fps
1280*720P-30fps
2. Pre-recording
Turn on the pre-recording function, the machine will trigger the recording when it vibrates, the recording time is 8 before the vibration, and 22 after the vibration. A total of 30 seconds of video, the video file is saved in DCIM/ Movie/ Y 20230525115213_000001
Note: The pre-recording folder is different from the recording folder.

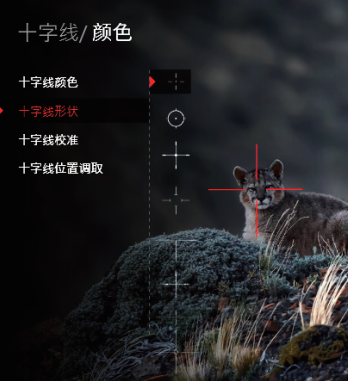
reticle
Rotate the knob to enter the cross-hatched menu, and press the enter key. Enter the cross-hatch setting menu (as shown below)
Optional menu:
·Cross line color
·Cross line shape
·Cross differentiation line calibration
·Crosshair position retrieval
Rotate the knob to enter the cross-hatched menu, and press the enter key. Enter the cross-hatch setting menu (as shown below)
Optional menu:
·Cross line color
·Cross line shape
·Cross differentiation line calibration
·Crosshair position retrieval
1. The color of the cross line
Crosshairs in 5 colors: You can turn the menu button to switch and select, and click the center of the menu button to confirm or change the shape, and choose according to your personal preference.

2. The shape of the cross line
8 styles of crosshairs, turn the menu button to change the style, click the center of the menu button to confirm.
3. Crosshair calibration
1. Go to the crosshair menu and select Crosshair Calibration. as shown in the picture
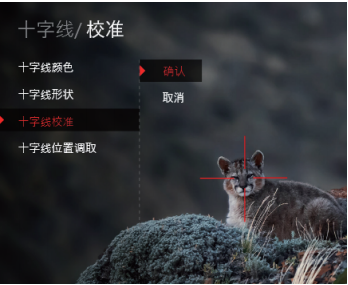
2.The white crosshair in the figure indicates the center of the screen, which is fixed. The red crosshair represents the currently adjusted crosshair. When entering this option for the first time, the white and red crosshairs are coincident (X=0 Y=0) indicating the coordinate value of the current crosshair; 100M indicates that the bullet can be adjusted
point distance.

3. Adjust the position of the X-axis, Y-axis to the ballistic point of the bullet through the rotation button
4. "Snowflake icon" function: (better and more accurate adjustment of the error between the bullet landing point and the target point)
Operating procedures
1. After shooting the target three times in a row, confirm the position of the ballistic point.
2 Click the "snowflake icon" to freeze the screen. At this time, the screen is prohibited from moving.
3. According to the offset distance value, adjust the reticle (x/y axis) to the new impact point. And click the OK button to save, and the setting is completed. If there is still an error, adjust repeatedly until the target point is hit.

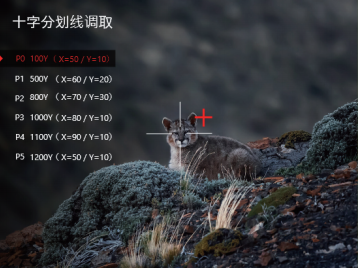
4. Retrieve the crosshair position
show
Once in this menu, the following submenus can be selected
·Screen brightness
·Screen widget display
·Auto off screen
·Magnification
·Contrast
Once in this menu, the following submenus can be selected
·Screen brightness
·Screen widget display
·Auto off screen
·Magnification
·Contrast

show
Once in this menu, the following submenus can be selected
·Screen brightness
·Screen widget display
·Auto off screen
·Magnification
·Contrast
Once in this menu, the following submenus can be selected
·Screen brightness
·Screen widget display
·Auto off screen
·Magnification
·Contrast

1. Screen brightness
Provide screen brightness AUTO 1-5 gears, of which 1 gear is the darkest, 5 gears are the brightest; AUTO is an automatic mode, and the screen brightness will automatically change according to changes in the environment. Users can set according to their needs.

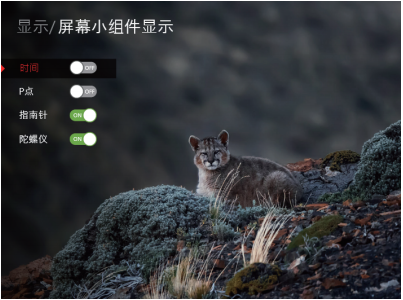
2. Screen widget display
This option can control some functions displayed on the preview interface. Such as compass, house elevation and so on. See the figure below for details. OFF is closed, and ON is opened.

3. Automatic screen off
The optional parameters are 1, 3, and 5 minutes. When the machine is not operating, the screen will automatically go black; saving power.
Note: Press any key to wake up the machine.

4. Electronic zoom ratio
Provide optional magnification 0.5X/1.0X/2.0X/4.0X, after selecting the magnification. When zooming in digitally, the digital zoom will zoom in according to the selected magnification.
5. Contrast setting
Adjust the corresponding contrast value according to (needs of on-site environment)

There are 5 levels of contrast, namely 1/2/3/4/5
6. version
Display the current machine firmware version; such as JS-Y05-20211029

Hot Tags: Night Vision Full Color Infrared Scope, China, Manufacturers, Suppliers, Factory, Made in China, Price, Wholesale, Newest, Advanced
Related Category
Silicon based Micro OLED Microdisplay
Digital Infrared Night Vision Sight
Thermal imaging night vision sight
AR/MR glasses
Send Inquiry
Please Feel free to give your inquiry in the form below. We will reply you in 24 hours.