Multifunctional Thermal Imaging Sight
This advanced Multifunctional Thermal Imaging Sight produced by Shenzhen Optical Microsemiconductor Technology Co, Ltd., is a compact and lightweight multifunctional thermal imaging sight. Using advanced non-block film technology, it has the characteristics of high sensitivity, high refresh rate, and high stability. It can image and detect all scenes 24 hours a day. It is used in reconnaissance observation, outdoor hunting, outdoor exploration, security and anti-theft, maritime operations, execution Various occasions such as special missions.
Send Inquiry
Product Description
The application range of Multifunctional Thermal Imaging Sight is extremely wide, and with the continuous development and popularization of infrared technology, new applications are constantly being developed. At present, there are mainly the following application categories. Scientific research, electrical equipment, electromechanical equipment, R&D quality control, building inspection, military and security.
Features of Multifunctional Thermal Imaging Sight
➢High resolution, uncooled infrared detector
➢Original imported high-resolution OLED color display (1024*768)
➢Low power consumption design, two 18650 batteries can work continuously for ≥8 hours
➢Simple and fast operation, friendly and humanized interface ➢Short start-up time, with the ability to quickly observe
➢Electronic zoom function to improve aiming accuracy
➢ Anti-light leakage goggles design, good concealment
➢5 cross cursor differentiation styles, 4 differentiation colors, adapt to different devices
➢Protection grade IP67, rainproof, high reliability, durable structure
➢Upgradable laser ranging module
Specification of Multifunctional Thermal Imaging Sight
| product name | Multifunctional Thermal Imaging Sight |
| detector type | Uncooled Infrared Detectors |
| working band | 8~14μm |
| Resolution (pixels) | 384×288/640×512 (12μm) |
| focal length | 35mm, 40mm (F1.0) |
| eyepiece | 0.39-inch HD OLED |
| monitor resolution | 1024*768 |
| crosshair differentiation style | 5 types |
| image mode | White Hot, Black Hot, Red Hot, False Color, Sky, Stroke |
| electronic zoom | 1X/2X/4X |
| Battery Type | 18650, 3.7V lithium battery × 2 (replaceable) |
| External video output | PAL analog video |
| Continuous working time | ≥8 hours |
| Operating temperature | -40°C~60°C |
| weight | ≤610g (42mm lens without battery and bracket) |
| size | 176mm (length) × 80mm (width) × 72mm (including bracket height |
| impact resistance | 6000 joules |
| Ranging module | external display |
1 Prepare before use
1.1 Unpacking
Before using this product, the following operations must be performed first:
➢ Open the packaging box and take out the equipment and parts. ➢ Check to make sure there are no missing accessories.
➢ Check that the interface , body , objective lens , and operation buttons of the device are not damaged.
➢ Make sure that all objective eyepieces are clean and can be used normally. Note: If any accessories are missing or damaged, please contact the after-sales service in time.
1.2 Battery Installation
1.1.1 Battery Description
1. Product name: 18650 lithium battery
2. Quantity: 2 knots
3. Working voltage: 3.7V
1.1.2 Installation
1. Please use a 18650 lithium-ion rechargeable battery with a rated voltage of 3.7V.
2. Unscrew the battery cover counterclockwise, put the positive and negative poles of the battery into the battery compartment according to the mark, and tighten the battery cover.
Note: It is strictly forbidden to reverse-install the battery, and the equipment damage caused by reverse installation shall be borne by the customer.
1.3 Focus
1. Choose a lens suitable for the current environment, and turn the lens to infinity.
2. Align the target, rotate the objective lens to adjust the clarity of the picture, so that the target reaches the clearest.
2 pages

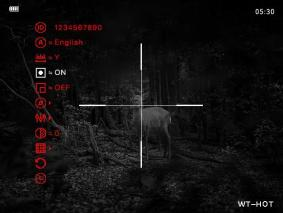
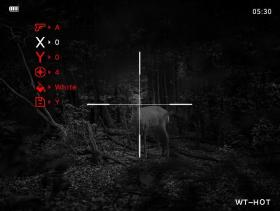
2.1 Main page
The first page you see when you turn on the device is the main page . The main page is composed of coordinates, electronic compass, time and other information.
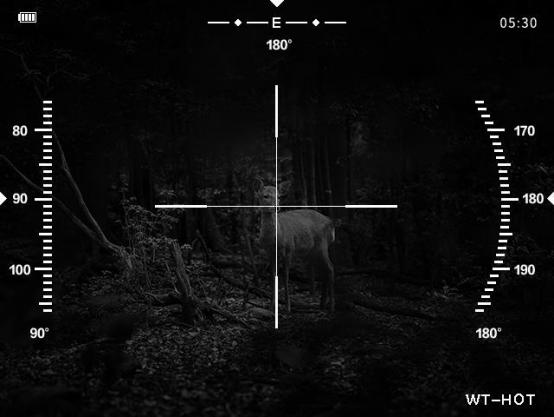
(1) Ruler
➢ Electronic compass
➢ Cross cursor
(2) Status bar
The status bar shows the current status of the system:
➢ Battery level
➢ mode
➢ time
➢ Magnification
3 functions
31 Key function definition
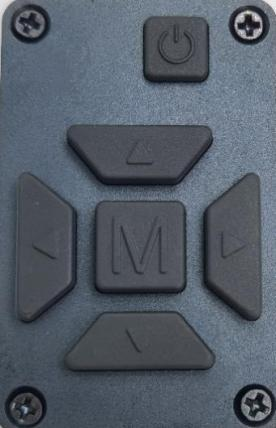
 Main menu up key/magnification shortcut key/picture-in-picture shortcut key
 Menu key/menu exit key
 Main menu down key/mode switching shortcut key
Short press the laser distance measurement key (optional) / value adjustment key
 Sub-menu option switch/numerical value increase key
 Power on/off/hibernate
3.2 Detailed function description
3.2.1 Power On/Off
Turn on the machine by briefly pressing the button button, turn off the machine by
 long pressing the button, and turn on the machine by
Short button to sleep.
Short press the button to power on, long press the button to shut down, and short press the button to sleep when it is on.
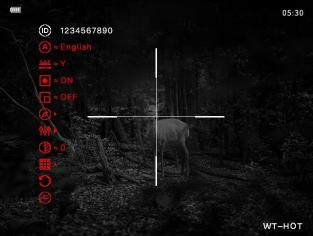
3.2.2 Menu
Wait for about 10 seconds after powering on, and in the double mode of the main page, short press the button to pop up the main menu
one. Then you can move and switch the various options in the main menu by short pressing the up and down keys. As shown in Figure 4-2.
3.2.3 Language
Short press the button to pop up the main menu, short press the button
 down to select "Language", short press the button
key to switch languages. As shown in Figure 4-3:
3.2.4 Laser ranging (optional)
Short press the button to pop up the main menu, by short pressing the button
 down, select "distance measurement", short press the button
key to switch the distance unit. As shown in Figure 4-4:

3.2.5 Hot spot tracking
Short press the button to pop up the main menu, short press the button
 down, select "hot spot tracking", short press
Press the button to toggle the switch. As shown in Figure 4-5:
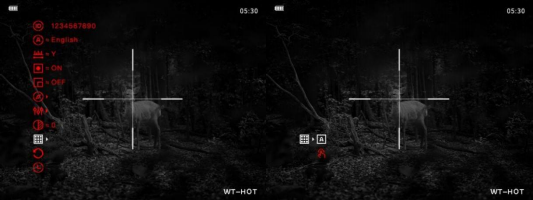
3.2.6 Picture in Picture
Short press the button to pop up the main menu, short press the button
 down to select "picture in picture", short press
Press the button to toggle the switch. As shown in Figure 4-6:

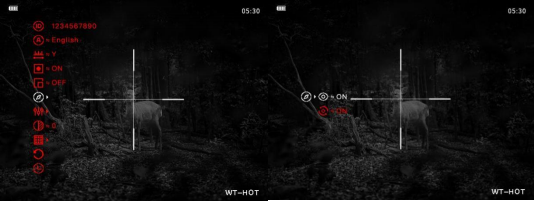
3.2.7 Electronic compass
Short press the button to pop up the main menu, short press the button
 down, select "electronic compass" and short press
key to switch to the submenu, compass and pan and tilt switch options, short press the button to switch the switch. as shown in the picture
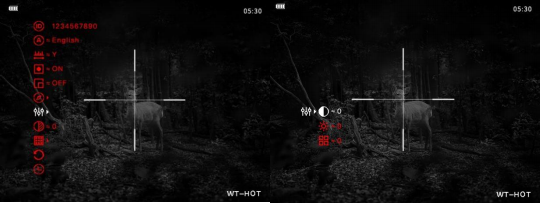
3.2.8 Image adjustment
Short press the button to pop up the main menu, by short pressing the button
 down, select "Image Adjustment", short press
Press the button to switch to the sub-menu, followed by contrast adjustment, brightness adjustment, and image mode switching.
Press the button to switch and adjust. As shown in Figure 4-8:
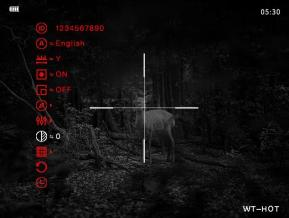
3.2.9 Sharpening Level Adjustment
Short press the button to pop up the main menu, short press the button down to select "sharp level adjustment", short
Press the button to adjust the sharpening level. As shown in Figure 4-9:
3.2.10 Blind element compensation
Short press the button to pop up the main menu. Short press the down button
 to select "Blind Element Compensation". Operation, select the manual compensation short key
 , adjust the X, Y axis to the blind element
position, and then perform blind element elimination according to the options and save it. As shown in Figure 4-10:
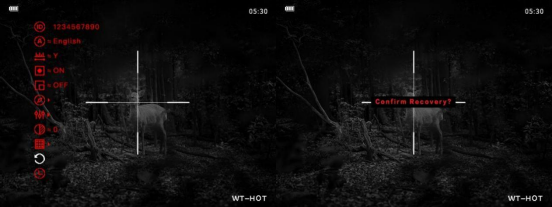
3.2.11 Restore factory settings
Short press the button to pop up the main menu, short press the down button, select "restore factory settings", short press the button, after the prompt appears, short press the button again to confirm the restoration. As shown in Figure 4-11:
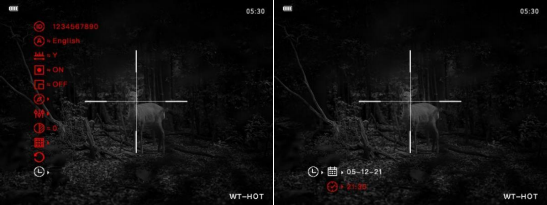
3.2.12 Time setting
Short press the button to pop up the main menu, short press the button to select "time setting" and short press the button to switch to the submenu, which are calendar and time adjustment options, short press the button to select, up
Press down to adjust. As shown in Figure 4-12:
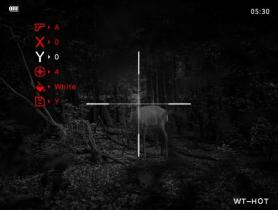
3.3 Cross Cursor Correction
3.3.1 Gun type memory
Long press the button to pop up the cross cursor adjustment menu, short press the down button to select "gun type selection", short press the button to switch the gun type. As shown in Figure 4-13:
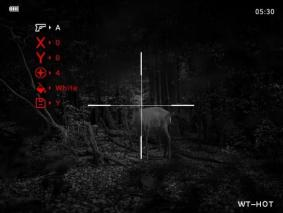
3.3.2 X-axis coordinate adjustment
Long press the button to pop up the cross cursor adjustment menu, short press the down button to select "X-axis", short press the button to adjust the X-axis coordinate position of the cross cursor. As shown in Figure 4-14:
3.3.3 Y-axis coordinate adjustment
Long press the button to pop up the cross cursor adjustment menu, short press the down button to select "Y-axis", and short press the button to adjust the Y-axis coordinate position of the cross cursor. As shown in Figure 4-15:
3.3.4 Adjusting the reticle style of the cross cursor
Long press the button to pop up the cross cursor adjustment menu, short press the down button to select "reticle style", short press the button to switch styles. As shown in Figure 4-16:
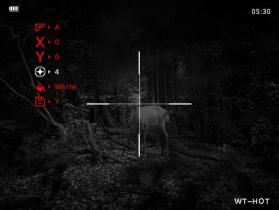
3.3.4 Cross cursor color adjustment
Long press the button to pop up the cross cursor adjustment menu, short press the down button to select "color", short press the button to switch the color of the cross cursor. As shown in Figure 4-17:

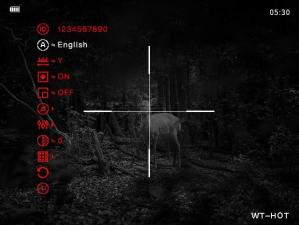
3.3.4 Style storage
Long press the button to pop up the cross cursor adjustment menu, short press the down button to select "Save Settings", the default is "Y", short press the button to save, the corrected and adjusted cross cursor style has been saved. Short press key if not to save. As shown in Figure 4-18:

3.3.5 Return to the main interface
Short press the button to exit the menu and enter the main interface.
The first page you see when you turn on the device is the main page . The main page is composed of coordinates, electronic compass, time and other information.
(1) Ruler
➢ Electronic compass
➢ Cross cursor
(2) Status bar
The status bar shows the current status of the system:
➢ Battery level
➢ mode
➢ time
➢ Magnification
3 functions
31 Key function definition
Main menu up key/magnification shortcut key/picture-in-picture shortcut keyMenu key/menu exit keyMain menu down key/mode switching shortcut keyShort press the laser distance measurement key (optional) / value adjustment key
Sub-menu option switch/numerical value increase key Power on/off/hibernate 3.2 Detailed function description
3.2.1 Power On/Off
Turn on the machine by
briefly pressing the button button, turn off the machine by long pressing the button, and turn on the machine byShort button to sleep.
Short press the button
to power on, long press the button to shut down, and short press the button to sleep when it is on. 3.2.2 Menu
Wait for about 10 seconds after powering on, and in the double mode of the main page, short press the button to pop up the main menu
one. Then you can move and switch the various options in the main menu by short pressing the up and down keys. As shown in Figure 4-2.
3.2.3 Language
Short press the button
to pop up the main menu, short press the button down to select "Language", short press the buttonkey to switch languages. As shown in Figure 4-3:
3.2.4 Laser ranging (optional)
Short press the button
to pop up the main menu, by short pressing the button down, select "distance measurement", short press the buttonkey to switch the distance unit. As shown in Figure 4-4:
3.2.5 Hot spot tracking
Short press the button
to pop up the main menu, short press the button down, select "hot spot tracking", short pressPress the button to toggle the switch. As shown in Figure 4-5:
3.2.6 Picture in Picture
Short press the button
to pop up the main menu, short press the button down to select "picture in picture", short pressPress the button to toggle the switch. As shown in Figure 4-6:
3.2.7 Electronic compass
Short press the button
to pop up the main menu, short press the button down, select "electronic compass" and short presskey to switch to the submenu, compass and pan and tilt switch options, short press the button
to switch the switch. as shown in the picture3.2.8 Image adjustment
Short press the button
to pop up the main menu, by short pressing the button down, select "Image Adjustment", short pressPress the button to switch to the sub-menu, followed by contrast adjustment, brightness adjustment, and image mode switching.
Press the button
to switch and adjust. As shown in Figure 4-8:3.2.9 Sharpening Level Adjustment
Short press the button
to pop up the main menu, short press the button down to select "sharp level adjustment", shortPress the button
to adjust the sharpening level. As shown in Figure 4-9:3.2.10 Blind element compensation
Short press the button
to pop up the main menu. Short press the down button to select "Blind Element Compensation". Operation, select the manual compensation short key, adjust the X, Y axis to the blind elementposition, and then perform blind element elimination according to the options and save it. As shown in Figure 4-10:
3.2.11 Restore factory settings
Short press the button
to pop up the main menu, short press the down button, select "restore factory settings", short press the button, after the prompt appears, short press the button again to confirm the restoration. As shown in Figure 4-11: 3.2.12 Time setting
Short press the button
to pop up the main menu, short press the button to select "time setting" and short press the button to switch to the submenu, which are calendar and time adjustment options, short press the button to select, up
Press down to adjust. As shown in Figure 4-12:3.3 Cross Cursor Correction
3.3.1 Gun type memory
Long press the button
to pop up the cross cursor adjustment menu, short press the down button to select "gun type selection", short press the button to switch the gun type. As shown in Figure 4-13:3.3.2 X-axis coordinate adjustment
Long press the button
to pop up the cross cursor adjustment menu, short press the down button to select "X-axis", short press the button to adjust the X-axis coordinate position of the cross cursor. As shown in Figure 4-14:3.3.3 Y-axis coordinate adjustment
Long press the button
to pop up the cross cursor adjustment menu, short press the down button to select "Y-axis", and short press the button to adjust the Y-axis coordinate position of the cross cursor. As shown in Figure 4-15: 3.3.4 Adjusting the reticle style of the cross cursor
Long press the button
to pop up the cross cursor adjustment menu, short press the down button to select "reticle style", short press the button to switch styles. As shown in Figure 4-16: 3.3.4 Cross cursor color adjustment
Long press the button
to pop up the cross cursor adjustment menu, short press the down button to select "color", short press the button to switch the color of the cross cursor. As shown in Figure 4-17:3.3.4 Style storage
Long press the button
to pop up the cross cursor adjustment menu, short press the down button to select "Save Settings", the default is "Y", short press the button to save, the corrected and adjusted cross cursor style has been saved. Short press key if not to save. As shown in Figure 4-18: 3.3.5 Return to the main interface
Short press the button
to exit the menu and enter the main interface.
Hot Tags: Multifunctional Thermal Imaging Sight, China, Manufacturers, Suppliers, Factory, Made in China, Price, Wholesale, Newest, Advanced
Related Category
Silicon based Micro OLED Microdisplay
Digital Infrared Night Vision Sight
Thermal imaging night vision sight
AR/MR glasses
Send Inquiry
Please Feel free to give your inquiry in the form below. We will reply you in 24 hours.